Toupet Fundoplicatio for GERD, Robot-Assisted

  1. Positioning and Setup

    505_Lagerung.jpeg
    Positioning and Setup 2

    Patient Positioning:

    • Supine position on a large vacuum cushion. The use of the cushion eliminates the need for additional supports
    • Padding for extremities and pressure-prone areas
    • A protective bar is recommended to shield the patient from robotic arms
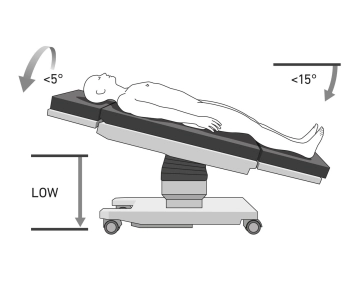
    • After trocar placement, tilt the operating table to:
      • 15° Anti-Trendelenburg
      • 5° Right tilt (tilt right)
    • The robotic arms are docked to the patient

    Cautions:

    • Ensure secure positioning due to the risk of abdominal wall injuries if the patient slips while docked to the robot
    • Verify the vacuum cushion for leaks before sterile draping
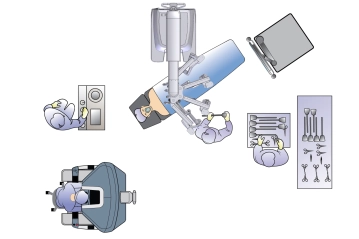
    Setup Details:

    • Surgeon: Operates from the robotic console with visibility of both the patient and the table assistant
    • Table Assistant: Positioned on the patient’s right
    • Anesthesiologist: At the patient’s head
    • Patient Cart: Approaches the patient from the left side
    • Scrub Nurse: Positioned to the right of the table assistant
  2. Pneumoperitoneum, Trocar Placement, and Docking

    505_Trokarpositionen.jpeg

    Pneumoperitoneum Creation:

    • Use a Veress needle at Palmer’s Point (left upper abdomen)
    • Establish insufflation and determine optimal trocar positions at the inflated abdomen

    Trocar Placement:

    • Robot Trocar Alignment:
      • All robotic trocars (8 mm) are positioned in a straight line approximately 20 cm below the anticipated target anatomy (using the xiphoid process as a landmark)
      • Maintain an 8 cm distance between trocars to avoid robotic arm collisions
    • Assistant Trocars:
      • One 12 mm trocar on the far-right side, aligned with robotic trocars
      • One 5 mm trocar in the epigastrium for liver retraction

    Docking and Targeting:

    • Place the patient in 15° Anti-Trendelenburg and 5° right tilt positions
    • Approach the Patient Cart from the right cranial side
    • Attach the robotic arms to the trocars
    • Perform targeting and insert instruments under direct vision
    • Park instruments under the anterior abdominal wall

     Instrument Configuration (Patient’s Right to Left):

    • Trocar 1: Fenestrated bipolar forceps
    • Trocar 2: 30° Camera
    • Trocar 3: Monopolar curved scissors, later replaced by vessel sealer extend
    • Trocar 4: Cardiere grasping forceps
    • Assistant Trocar 1 (12 mm, right): Atraumatic grasping forceps, optionally suction
    • Assistant Trocar 2 (5 mm, epigastric): Liver retractor

    Cautions and Recommendations:

    • Remote Control Setup:
      • Position the wide black ring of each trocar at the level of the muscular abdominal wall to minimize shear forces during movement
    • Trocar Inspection:
      • Before starting the operation, inspect the robotic trocars with the camera inserted via the assistant trocar to ensure proper placement
  3. Pre-Docking Checklist

    • Skin incision in the left upper abdomen, insertion of the Veress needle
    • Creation of pneumoperitoneum
    • Marking of lines and points for trocar placement
    • Insertion of an 8 mm trocar
    • Manual introduction of the camera
    • Placement of three additional Xi trocars, spaced 8 cm apart
    • Assistant’s trocar on the far right (12 mm) and epigastric assistant’s trocar (5 mm)
    • Patient positioning: 15° anti-Trendelenburg and 5° tilt to the right
    • Docking the camera arm and introducing the camera
    • Targeting setup
    • Docking three additional arms
    • Ensuring arm placement at least one fist-width apart
    • Introduction of instruments and alignment to target anatomy (1: bipolar forceps, 2: camera, 3: monopolar scissors/vessel sealer, 4: Cardiere forceps
    • Verification of remote center functionality via the assistant’s trocar
    • BURP maneuver (Backward-Upward-Rightward Pressure)
    • Transition to the console
  4. Tensioning the Stomach and Incising the Lesser Omentum

    Video
    Tensioning the Stomach and Incising the Lesser Omentum

    The left lobe of the liver is retracted with a Nathanson retractor, and the stomach is held taut using the Cardiere forceps. In the area of the pars flaccida, the lesser omentum is incised with the monopolar scissors, exposing the right crus of the diaphragm.

    Tip: Placement of a thick gastric tube (40 – 42 Fr gastric lavage tube) under direct visualization by anesthesia colleagues is advisable.

  5. Preparation of the Diaphragmatic Crura and Mediastinal Entry

    Video
    Preparation of the Diaphragmatic Crura and Mediastinal Entry

    Expose the right diaphragmatic crus and proceed anteriorly across the anterior commissure to expose the left diaphragmatic crus.

    Caution: During this surgical step and subsequently, take care to identify and preserve the anterior vagal branch. The mediastinum is opened ventrally, and the esophagus is mobilized retroesophageally to create a window.

Encircling the Distal Esophagus

Insert an EasyFlow drain through the assistant’s trocar. Pass the drain through the retroesophageal

Activate now and continue learning straight away.

Single Access

Activation of this course for 3 days.

€7.99 inclusive VAT

Most popular offer

webop - Savings Flex

Combine our learning modules flexibly and save up to 50%.

from €3.29 / module

€39.50 / yearly payment

price overview

Robotik

Unlock all courses in this module.

€7.42 / month

€89.00 / yearly payment