Total gastrectomy, robotically assisted with D2 lymphadenectomy

Reading time readingtime 44:53 min.
Activate now
  1. Positioning and Setup

    506 Setup Magen.jpg
    506_Lagerung.jpeg

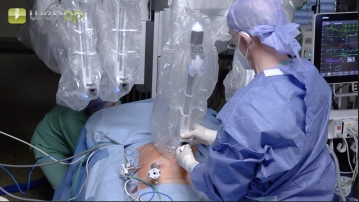
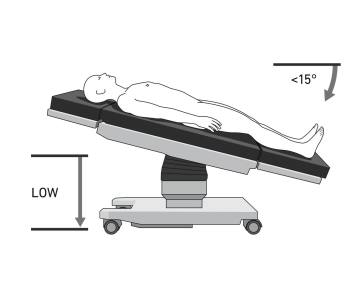
    The patient is positioned in a supine position with a slight reverse Trendelenburg position of approximately 10-15 degrees on the large vacuum cushion. The left arm is positioned on an arm support rail to the side to keep the surgical area clear and to optimize access for the surgical team and the robotic arms. The use of the vacuum cushion typically eliminates the need for additional supports, which speeds up preparation.

    Note: The precise positioning of the patient is crucial for the success of the surgery, as it ensures optimal access of the robotic arms to the surgical sites in the abdominal cavity and minimizes the risk of complications.

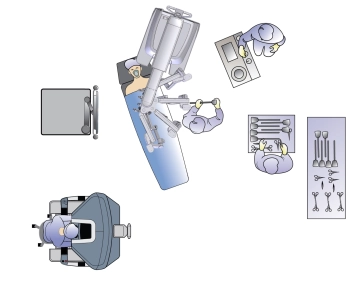
    The surgical team usually consists of two surgeons: the console surgeon, who controls the robot from a console, and the table assistant, who assists directly at the operating table. The table assistant is seated to the left of the patient. The video tower, which transmits the images from the robotic camera, is positioned on the right at torso height. Anesthesia is located at the head of the patient. The OR nurse stands to the left of the table assistant.

    Caution: Correct positioning is of particular importance due to the docking of the patient to the robot's manipulator. Incorrect positioning or slipping of the patient during the operation poses a significant risk of injury to the abdominal wall by the robotic arms or instruments. Therefore, a careful check of the positioning before the start of the operation is essential.

    Remark: Vacuum cushions can develop leaks over time. Before the sterile draping of the patient, the integrity of the vacuum cushion must be checked again to ensure a secure and stable hold of the patient throughout the procedure. Regular maintenance of the vacuum cushions is also advisable.

  2. Pneumoperitoneum and trocar positioning

    Video
    506_Trokarpositionen.jpg

    The creation of a pneumoperitoneum is performed using a Veress needle at the Palmer's point in the left upper abdomen. Palmer's point is a safe access point for creating the pneumoperitoneum because it is generally free of major vessels. It is located in the left upper abdomen, approximately 2–3 cm below the costal margin in the midclavicular line. Due to the varying abdominal wall compliance, it is advisable to determine the optimal position of the trocars on the inflated abdomen with pneumoperitoneum.

    The four robotic trocars are positioned in a line 15 cm below the anticipated course of the transverse colon (always below the umbilicus). The trocars are inserted symmetrically, with a distance of 8 cm between each. The trocar on the far left is a 12-mm robotic trocar, while the other three are 8-mm trocars. In the left lower abdomen, between trocar 3 and 4, a 12-mm assistant trocar is inserted 3 cm caudal to the aforementioned trocar line. The patient is placed in a moderate Trendelenburg position.

    Caution: The insertion of the trocars and the removal of the Veress needle are always performed under camera optical control.

  3. Docking

    Video
    506_03 Docking.jpg

    The patient cart is positioned slightly to the left over the patient's head (daVinci X). On the Xi platform, the robot can alternatively be docked from either side of the patient. For the X, the arm sequence follows the order 4, 1, 2, 3. The arms are connected (docked) with the four robotic trocars. Subsequently, the instruments are introduced under visual control and parked under the ventral abdominal wall.

    Caution: The trocars must be positioned with the wide black ring (Remote Center) at the level of the muscular abdominal wall to avoid injuries during movements.

    Note: Ideally, the robotic trocars are inspected with the camera via the assistant trocar when introducing the robotic instruments. This allows the position of all robotic trocars to be easily checked again before the start of the operation.

  4. Checklist before docking

    o Incision in the left upper abdomen, insertion of the Veress needle

    o Pneumoperitoneum

    o Marking the line (15-20 cm caudal of the target area) and points for trocars

    o Insertion of a robotic trocar

    o Manual insertion of the camera

    o Insertion of 3 Xi trocars each 8 cm apart under vision (far left: 12mm)

    o Assistant trocar 12 mm caudal between 3 and 4

    o Positioning: 15° Anti-Trendelenburg

    o Dock camera arm + insert camera (3)

    o Targeting with Xi

    o Dock 3 additional arms

    o Arms always one fist width apart

    o Insertion of instruments and introduction into target anatomy (1: Cadiere forceps, 2: bipolar forceps, 3: camera 4: monopolar scissors) (order from right to left)

    o Control of the remote center via assistant trocar

    o Burping (press Port-Clutch 2x to relieve the abdominal wall)

    o Switch to the console

  5. En bloc omentectomy

    Video
    k-506_05.jpg

    The operation is performed with a Cadiere forceps through the right trocar, a bipolar forceps to the left of it, followed by the camera and the monopolar scissors on the far left.

    The omentum is tensed ventrally and cranially with the Cadiere grasping forceps. The table assistant holds the transverse colon caudally to create countertraction.

    The procedure begins in the midline by initially lifting the omentum from the transverse colon in layers until the bursa is reached. The dissection proceeds to the left, detaching the omentum from the left flexure and, if adherent, from the left-sided colon. Subsequently, the dissection proceeds to the right, where the transverse mesocolon is detached from the “mesogastrium” (trunk of the right gastroepiploic vessels). Finally, the omentum is detached from the right flexure and, if necessary, from the ascending colon.

    Caution:

    The omentum extends very close to the transverse colon. During dissection, thermal lesions of the transverse colon must be avoided!

    Note:

    Omentectomy is a complex and often time-consuming surgical step. However, for oncological reasons, we adhere to en bloc omentectomy, as it can be performed quickly and safely with the robot.

Dissection of the right gastroepiploic artery and vein

The stomach with the attached omentum is held cranially and ventrally with the Cadiere. At the infe

Activate now and continue learning straight away.

Single Access

Activation of this course for 3 days.

€7.99 inclusive VAT

Most popular offer

webop - Savings Flex

Combine our learning modules flexibly and save up to 50%.

from €3.70 / module

€44.50 / yearly payment

price overview

Robotik

Unlock all courses in this module.

€7.42 / month

€89.00 / yearly payment