Sigmoid resection, oncological, robotically assisted with medial-to-lateral approach

Reading time readingtime 36:03 min.
Activate now
  1. Positioning

    Positioning 1
    Positioning 2
    • Ideally, positioning is done in the lithotomy position on a large vacuum cushion (on the right side, the cushion supports the rib cage and iliac crest so that the patient's weight in right lateral position does not press on the arm.
    • It is recommended to adduct both arms (caution: cotton wrapping when positioning with a cloth sling)
    • Cotton wrapping of the knees and proximal lower legs is also performed to prevent pressure injuries.
    • For leg positioning, so-called "swan-fins" or padded "boots" are recommended, so that the legs can be moved separately and covered sterilely if necessary. Alternatively, the legs can be positioned in leg holders with fixation in these.
    • The legs should be adjustable via the OR table control during the procedure.

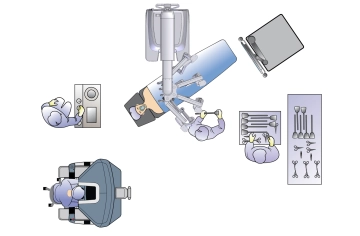
    Note: Positioning is of particular importance due to docking the patient to the robot manipulator. The risk of injury to the abdominal wall when the patient slips must also be considered. With coupled tables in the Xi system, intraoperative position changes are possible without undocking. In the absence of "Table-Motion" technology, the surgical robot must always be undocked and removed from the OR table before any position change.

    Caution: Vacuum cushions can have leaks. Therefore, they should be checked again before sterile draping.

  2. Trocar positioning and docking

    Video
    Trocar positioning and docking

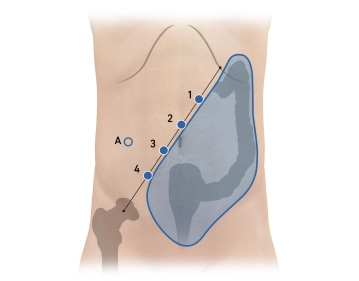
    Creation of a capnoperitoneum by inserting a Veress needle at Palmer's Point. The four 8mm robotic trocars are aligned in a straight line. The angle of the line corresponds to the connection of the intersection of the left midclavicular line/rib arch and the right femoral head. The line itself runs parallel 5-8 cm further to the right. Trocar 1 is located in the left epigastrium. Trocar 4 is two centimeters ventral to the right anterior superior iliac spine. Ideally, there is a distance of 8 cm between the individual trocars (minimum 7 cm to maximum 10 cm). The 12 mm assistant trocar is located 4 cm cranial to trocar 4 in the right anterior axillary line. The patient is positioned maximally to the right and moderately head down. The axis of the manipulator (laser marking) is aligned so that it points over the left anterior superior iliac spine to camera trocar 3. The arms are connected (docked) with the four 8mm robotic trocars. Subsequently, the instruments are introduced under visual control and parked under the ventral abdominal wall.

    Caution: The trocars must be positioned with the wide black ring at the level of the muscular abdominal wall (so-called remote control) to avoid injury during movement.

    Note: Ideally, the robotic trocars are inspected with the camera via the assistant trocar when introducing the robotic instruments. This allows the position of all robotic trocars to be easily checked again before the start of the operation.

    Note: Step 11 of the perioperative management provides an OR checklist up to docking, which can also be actively used in the operating room during the first procedures.

  3. Preparation and transection of the vessels

    Video
    Preparation and transection of the vessels

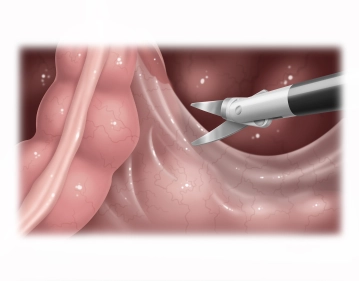
    The operation is performed using a Cadiere forceps through the cranial left trocar, with bipolar forceps to the right, followed by the camera and the monopolar scissors on the far right. The mesosigmoid is tensioned ventrally with the Cadiere. The layer between the visceral and parietal pelvic fascia is located at the level of the promontory. Under visual preservation of the autonomic nerve fibers beneath the parietal fascia, preparation is carried out up to the inferior mesenteric artery. The vessel is clipped and transected. The left mesocolon is dissected from the prerenal fascia and the underlying visible left ureter in a layer-appropriate manner. Cranially, the inferior mesenteric vein is reached, which is clipped and transected at the lower edge of the pancreas.

    Caution: Always double clip vessels centrally during robot-assisted operations.

    Note: The console surgeon is responsible for the situs, not the table assistant. The Cadiere forceps must be continuously adjusted and repositioned for optimal exposure.

  4. Mobilization of the left flexure from medial

    Video

    The dissection from medial to lateral is advanced until reaching the left lateral abdominal wall. It is very helpful to open a peritoneal window lateral to the descending colon towards the abdominal wall. Dissection is carried out cranially until reaching the pancreas. The left-sided transverse mesocolon is carefully detached from it. This is easiest from the lateral side. The omentum, which already appears here lateral to the left flexure, is dissected layer by layer from it. The omental bursa does not necessarily need to be widely opened at this point.

    Caution: No strong traction on the left flexure, as this can otherwise injure adhesions between it and the splenic capsule. There may also be arterial bridging vessels between the anterior pancreatic wall and the transverse mesocolon.

    Note: It is always important to use the "second left hand" to maintain traction and countertraction.

  5. Mobilization of the left flexure from lateral

    Video

    Now the remaining peritoneal flap between the descending colon and the lateral abdominal wall is incised from lateral to caudocranial direction with scissors. The omentum is tensed ventrally with the Cadiere forceps. The colon is pulled caudally and to the right by the table assistant. With forceps and scissors, the omentum is gradually completely detached from the left flexure to the middle of the transverse colon. The posterior wall of the stomach is broadly exposed.

    Caution: The static work must be done by the Cadiere grasping forceps. The bipolar forceps is the "trouble shooter," for example, in case of bleeding from the omentum.

    Note: The work on the left flexure is done at the extreme edge of the manipulator. The tips of all four instruments (including the camera) must remain very close together to avoid collisions of the arms.

Lateral mobilization of the rectosigmoid junction

Now turn to the small pelvis from the lateral side. Release the embryonic and here also clearly pos

Activate now and continue learning straight away.

Single Access

Activation of this course for 3 days.

€7.99 inclusive VAT

Most popular offer

webop - Savings Flex

Combine our learning modules flexibly and save up to 50%.

from €3.70 / module

€44.50 / yearly payment

price overview

Robotik

Unlock all courses in this module.

€7.42 / month

€89.00 / yearly payment