Rectal resection, robot-assisted with total mesorectal excision (TME)

Reading time readingtime 43:02 min.
Activate now
  1. Positioning and Setup

    Positioning and Setup 1
    Positioning and Setup 2
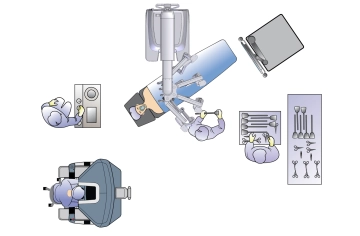
    • Ideally, positioning is done in lithotomy position on a large vacuum cushion (on the right side, the cushion supports the rib arch and the iliac crest, so that the weight of the patient in right lateral position does not press on the arm.
    • It is recommended to position both arms adducted (caution: cotton wrapping when positioning with a cloth sling)
    • Cotton wrapping of the knees and proximal lower legs is also performed to avoid pressure injuries.
    • For leg positioning, so-called "swan fins" or padded "boots" are recommended, so that the legs can be moved separately and sterilely covered if necessary. Alternatively, the legs can be positioned in leg shells with fixation of the legs in them.
    • The legs should also be adjustable in angle via the operating table control during the procedure.
    • Before washing, a digital rectal examination (DRE) or a rectoscopy is always performed to ensure that nothing obstructs the perianal anastomosis site by a circular stapler.

    Note: The positioning is particularly important due to the docking of the patient to the manipulator of the robot. The risk of injury to the abdominal wall when the patient slips must also be considered. With coupled tables in the Xi system, intraoperative position changes are possible without disconnecting. In the absence of "Table-Motion" technology, the surgical robot must always be disconnected and removed from the operating table before any position change.

    Caution: Vacuum cushions may have leaks. Therefore, they should be checked again before sterile covering.

  2. Creation of the capnoperitoneum, trocar positioning and docking

    Video
    Creation of the capnoperitoneum, trocar positioning and docking

    Establishment of a capnoperitoneum by inserting a Verres needle at Palmer's Point. Creation of the camera port. Insertion of the camera. Diagnostic overview. The four 8mm robotic trocars are positioned in a straight line. The angle of the line corresponds to the connection point of the left midclavicular line/rib cage and the right femoral head. The line itself runs parallel 5-8 cm further to the right. Trocar 1 is located in the left epigastrium. Trocar 4 is two centimeters ventral to the right anterior superior iliac spine. Ideally, there is a distance of 8 cm between the individual trocars (at least 7 cm to a maximum of 10 cm). The 12 mm assistant trocar is located 4 cm cranial to trocar 4 in the right anterior axillary line. The patient is positioned maximally to the right and moderately head down. The axis of the manipulator (laser marking) is aligned to point over the left anterior superior iliac spine towards camera trocar 3. Performing a laparoscopically controlled TAP block before inserting the trocars. The arms are connected with the four 8mm robotic trocars (docked). Subsequently, the instruments are introduced under visual control and parked under the ventral abdominal wall.

    Caution: The trocars must be positioned with the wide black ring at the level of the muscular abdominal wall (so-called remote center) to avoid injury during movement.

    Note: Ideally, the robotic trocars should be inspected with the camera via the assistant trocar when inserting the robotic instruments. This allows for easy verification of the position of all robotic trocars before the start of the surgery.

  3. Pre-docking checklist

    Checklist Xi Rectal Resection up to Docking

    • Skin incision left upper abdomen, insertion of the Verres needle
    • Pneumoperitoneum
    • Marking line and points for trocars
    • Insertion of 4 Xi trocars 8 cm apart
    • Insertion of the camera by hand after inserting the first trocar and inserting the others under vision
    • 12 mm robotic trocar with reducer sleeve on the 3 or possibly 4
    • Assistant trocar right mid-abdomen above the 4
    • Positioning: 10° Trendelenburg, 10° Tilt right
    • Dock camera arm + insert camera
    • Targeting
    • Dock 3 additional arms
    • Arms always one fist width apart
    • Check the remote center
    • Insertion of instruments and introduction into target anatomy (1: left cranial: Tip up, 2: bipolar forceps, 4: right caudal monopolar scissors/vessel sealer, 3: camera/stapler
    • Burping
    • Switch to the console
  4. Vessel transection

    Video
    Vessel transection 1
    Vessel transection 2

    The operation begins with the setting "two left hands", meaning that in Port 1 there is a Cadiere or Tip-Up grasping forceps, in Port 2 the bipolar forceps, in Port 3 the camera, and in Port 4 the scissors, the vessel sealer or the clip applier.

    Note: At the beginning of the operation, a full exploration of the abdomen is performed, and visual exclusion of metastatic spread is conducted.

    Relocation of the small intestine to the right upper abdomen is performed. The mesosigmoid is retracted ventrally using the Cadiere forceps. The layer between the visceral and parietal pelvic fascia is identified at the level of the promontory. While carefully preserving the autonomic nerve fibers beneath the parietal fascia, preparation is carried out up to the inferior mesenteric artery. The vessel is clipped and transected.

    Note: The transection of the artery is performed close to the origin, about 1 cm after its emergence from the aorta, to preserve the autonomous nerve plexuses.

    The left-sided mesocolon is carefully detached layer by layer from the prerenal fascia and the underlying visible left ureter. Cranially, the inferior mesenteric vein is reached, exposed at the lower border of the pancreas, secured with clips, and transected.

    Caution: Always double-clip vessels centrally during robot-assisted surgeries.

    Note: The console surgeon is responsible for the surgical site, not the table assistant. The Cadiere grasping forceps must be continuously adjusted and repositioned to ensure optimal exposure.

  5. Mobilization of the left flexure from medial

    Video
    Mobilization of the left flexure from medial

    The dissection from medial to lateral is advanced until the left lateral abdominal wall is reached. It is very helpful to create a peritoneal window lateral to the descending colon towards the abdominal wall. Cranially, the dissection is carried out up to the pancreas. The left-sided transverse mesocolon is carefully detached from the pancreas, which is easiest to achieve from the lateral approach. The omentum, which already appears lateral to the left flexure at this point, is carefully separated layer by layer. It is not absolutely necessary to widely open the omental bursa at this stage.

    Cave: Avoid strong traction on the left flexure to prevent injury to adhesions between it and the splenic capsule. There may be arterial bridging vessels between the anterior surface of the pancreas and the transverse mesocolon.

Mobilization of the left colonic flexure from the lateral approach

Now, the remaining peritoneal sheet between the descending colon and the lateral abdominal wall is

Activate now and continue learning straight away.

Single Access

Activation of this course for 3 days.

€7.99 inclusive VAT

Most popular offer

webop - Savings Flex

Combine our learning modules flexibly and save up to 50%.

from €3.70 / module

€44.50 / yearly payment

price overview

Robotik

Unlock all courses in this module.

€7.42 / month

€89.00 / yearly payment

Adverts
Da Vinci Xi

... - Operations in general, visceral and transplant surgery, vascular surgery and thoracic surger

Activate now and continue learning straight away.

Single Access

Activation of this course for 3 days.

€7.99 inclusive VAT

Most popular offer

webop - Savings Flex

Combine our learning modules flexibly and save up to 50%.

from €3.70 / module

€44.50 / yearly payment

price overview

Robotik

Unlock all courses in this module.

€7.42 / month

€89.00 / yearly payment