Open the abdomen through a bucket-handle incision about 3-4 fingers below the costal arches with transection of skin, subcutaneous tissue, anterior fascial lamina, rectus muscle and posterior fascial lamina/peritoneum. Divide the round ligament of the liver between clamps and secure the stumps with suture ligatures (Vicryl® 2-0). Free the falciform ligament with monopolar electrocautery far over the anterior aspect of the liver. After draping the margins of the incision with damp lap towels install the retractor system comprising a frame and a cable winch system such as the Ulrich retractor. This is followed by systematic exploration of the abdominal cavity: Liver (metastases?), stomach (tumor? position of gastric tube), small intestine (adhesions? peritoneal carcinomatosis?), large bowel (tumor?), greater omentum (adhesions? carcinomatosis of peritoneal cavity?)
-
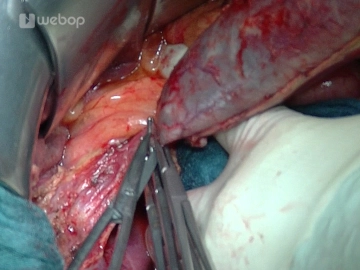
Bucket-handle incision
![Bucket-handle incision]()
-
Antegrade cholecystectomy
![Antegrade cholecystectomy]()
The resection phase starts with the antegrade cholecystectomy: After clamping the fundus of the gallbladder release it from the liver bed using bipolar forceps and scissors. Expose the cystic duct and cystic artery, and after clamping each with an Overholt forceps, divide them and secure each central remnant with a suture ligature (Prolene® 3-0). Once the gallbladder has been taken down and handed over for histology, take a swab of the bile secretion for microbiology.
-
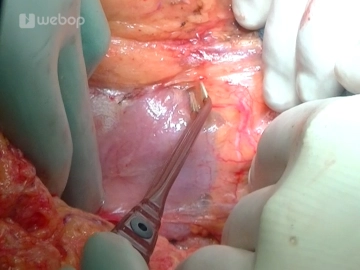
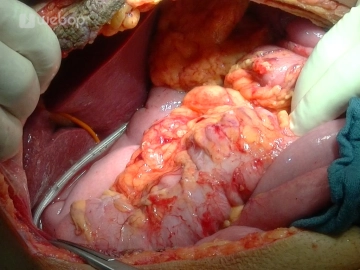
Mobilizing the hepatic flexure/Kocher maneuver
![Mobilizing the hepatic flexure/Kocher maneuver]()
Mobilize the right colic flexure by incising the peritoneal reflection lateral to the ascending colon and carry the incision around the hepatic flexure. Gentle traction on the colon will tauten the avascular tissue plane posterior to the colon, and the mesocolon may be released from the retroperitoneal space, anterior aspect of the duodenum and the head of the pancreas.
Mobilize the duodenum with the Kocher maneuver: Pull the mobilized colon section over to the left, and after incising along the outer margin of the duodenum with bipolar forceps and dissecting scissors release the duodenum together with the head of the pancreas from its retroperitoneal attachments. Continue mobilizing the head of the pancreas across the aortic plane up to the ligament of Treitz so that the head of the pancreas can be completely enclosed and palpated from posterior (tumor size? consistency?)
-
Opening the lesser sac
![Opening the lesser sac]()
Enter the lesser sac by freeing the greater omentum from the hepatic flexure to the left third of the transverse colon. Although the lesser sac displays minor adhesions, it can be easily freed and exposed with the bipolar forceps. This allows pancreatic exploration on the left side as well.
-
Exposing the inferior aspect of the pancreas and the mesenterico-portalvenous vascular axis
![Exposing the inferior aspect of the pancreas and the mesenterico-portalvenous vascular axis]()
Continue the dissection along the inferior aspect of the pancreas by exposing the superior mesenteric and portal vein. To this end, divide the veins of the pancreatic head with the LigaSure® or between suture ligatures (Prolene® 4-0 or 5-0). Starting in the plane of the superior mesenteric / portal vein now tunnel the pancreas from inferior and place stay sutures at its inferior aspect to the left and right of the portal vein.
Caution: Bleeding from the portal vein! - put as little traction on the tissue as possible!
-
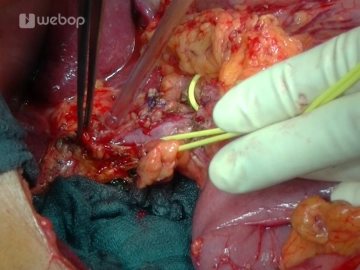
Dissecting the hepatoduodenal ligament
![Dissecting the hepatoduodenal ligament]()
After opening the lesser omentum and exposing the common hepatic artery at the superior aspect of the pancreas, dissect the lymph nodes and then divide the gastroduodenal and right gastric arteries and secure their central stumps with suture ligatures (Prolene® 4-0 or 3-0).
Note: Before transecting the gastroduodenal artery, assess the blood flow in the hepatic artery proper at the hepatic portal.
Dissect the common bile duct (CBD) and tape it with a vessel loop. After exposing the portal vein at the superior aspect of the pancreas, now tunnel the pancreas starting superiorly and place stay sutures at its superior aspect to the left and right of the portal vein. Once both dissection planes have been joined, tape the completely tunneled pancreas with a vessel loop as well.
-
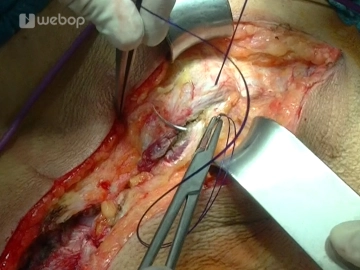
Transecting the common bile duct
![Transecting the common bile duct]()
Gently lift the CBD by its tape, transect the duct, take a swab for microbiology, flush the hepatic stump with 100-300 mL of saline, and temporarily occlude the hepatic remnant with a bulldog clamp. Follow the CBD toward the duodenum and with a suture ligature (Vicryl® or Prolene® 2-0) close it and the cystic duct just before the CBD enters the duodenum.
-
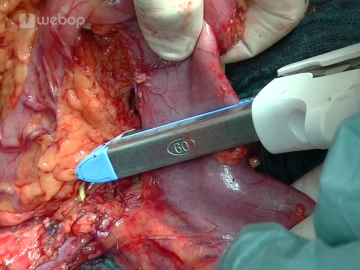
Transecting the postpyloric duodenum
![Transecting the postpyloric duodenum]()
After freeing the postpyloric duodenum and dividing the right gastroepiploic artery, transect the duodenum with a stapler (GIA 60) about 3 cm distad to the pylorus. The view for the next steps is improved by covering the staple line of the transected stomach with a moist lap strip and retracting the stomach into the left upper quadrant for the time being.
-
Transecting the jejunum
![Transecting the jejunum]()
After locating the first jejunal loop distal to the ligament of Treitz, identify the arterial and venous arcades under transillumination and dissect them with the LigaSure®. Once the jejunum has been transected with the stapler, divide the mesentery of the proximal limb of the jejunal loop close to the intestine up to the duodenojejunal transition at the level of the ligament of Treitz and retract the intestinal loop into the upper abdomen. Close the newly created opening at the ligament of Treitz (Prolene® 5-0).
-
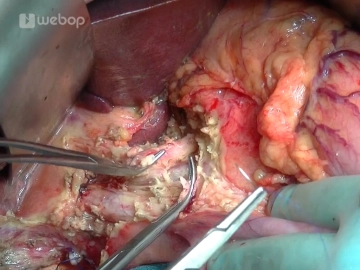
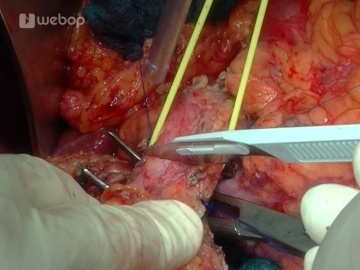
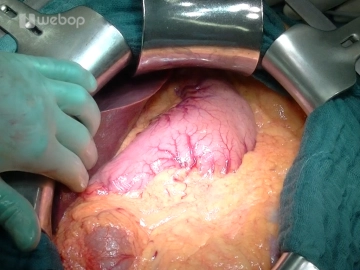
Mobilizing the "Whipple specimen" and dividing the pancreas
![Mobilizing the "Whipple specimen" and dividing the pancreas]()
Do not divide the pancreas in the plane of the portal vein yet. Instead, mobilize the head of the pancreas with the uncinate process from the right step-by-step and free it, including the surrounding lymph nodes, down to the level of the portal vein. Suture ligate and divide the vessels with Prolene 4-0 or 5-0 or the LigaSure®.
Divide the pancreas at the level of the neck with a scalpel (posteriad with scissors). With a scalpel obtain a specimen of the transected left margin of the pancreas and hand it off for frozen section.
Secure hemostasis of the left pancreas with Prolene® 5-0 sutures. In case of confirmed or suspected cancer, complete the lymphadenectomy around the celiac trunk and between the aorta and vena cava.
Note:
- In case of suspected cancer of the CHD, a specimen of the transected margin must also be obtained and handed off for frozen section.
- It is also possible to divide the pancreas before it has been completely mobilized because at times this might technically be easier.
- From an oncological point of view intraoperative frozen section of the pancreatic resection margin is always recommended. If invasive cancer or high-grade epithelial dysplasia is present at the resection margin, further resection is indicated. Total pancreatectomy should be considered in those cases where two additional resection steps do not yield an unremarkable resection margin.
-
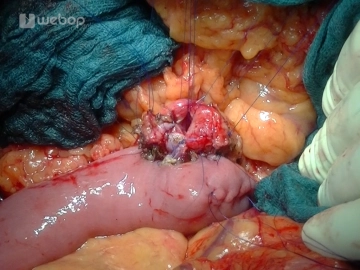
End-to-side retrocolic pancreatojejunostomy
![End-to-side retrocolic pancreatojejunostomy]()
The reconstruction phase starts by creating an opening in the mesentery to the right of the middle colic artery for the aboral limb of the previously divided jejunal loop. Oversew the staple line with a running suture (PDS® 5-0). In its retrocolic reposition the loop should rest without any tension anterior to the pancreatic remnant and CBD stump.
Suture the pancreatic anastomosis in two layers. For the inner suture line, preplace three interrupted transductal sutures each for both the anterior and posterior suture line (Prolene® 5-0). Fashion the outer suture line of the posterior wall by preplacing interrupted seromuscular pancreatic capsule/parenchyma sutures (PDS® 5-0). Tying these interrupted sutures will approximate the jejunum to the pancreatic capsule. After opening the jejunum over a distance of about 1.5 cm (depending on the thickness of the pancreas and the width of the pancreatic duct), fashion the inner suture line of the posterior wall by passing the preplaced interrupted transductal sutures as full-thickness sutures through the jejunum (duct-to-mucosa suture = approximating the pancreatic duct to the mucosa). This completes the two-layered suture line of the posterior wall.
The suture line of the anterior wall is fashioned the same way: First fashion the inner suture line by passing the preplaced transductal sutures full thickness through the jejunum (before tying these sutures check the patency of the pancreatic duct with a probe), and then the outer suture line (PDS® 5-0) as interrupted seromuscular capsule/parenchyma sutures.
-
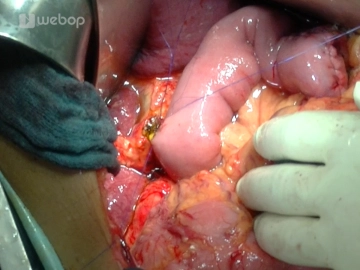
End-to-side hepaticojejunostomy
![End-to-side hepaticojejunostomy]()
The bilioenteric anastomosis is fashioned approximately 10-15 cm downstream of the pancreatic anastomosis. First, splay open the remnant of the CHD with lateral stay sutures (Prolene® 5-0). As demonstrated in the video, enlarge the lumen of delicate, small-caliber bile ducts by incising them with Potts scissors. After opening the jejunum at its antimesenteric aspect over a distance of about 5 mm, place mucosa everting anchoring sutures (PDS® 6-0). For the single-layeranastomosis, preplace seven (or more, depending on the size) interrupted sutures PDS® 5-0 (or PDS® 6-0 in case of very small caliber ducts) each for the posterior and anterior wall and then tie them. Inserting a 2.5 mm T-drain before completing the suture line of the anterior wall is optional and recommended in difficult anastomosis such as presented here in the video.
After the bilioenteric anastomosis has been completed, bile can be easily aspirated via the T-drain. Check the anastomosis for any leakage by instilling normal saline through the indwelling T-drain. Bring out the drain through a stab wound in the right upper quadrant and anchor it at skin level. Close the opening in the mesocolon for the pulled up jejunal loop with interrupted sutures (Prolene® 5-0) which also anchor the loop.
Note: Loop the T-drain on top of the liver to protect the anastomosis from possible injury due to premature traction on the drain.
-
End-to-side antecolic duodenojejunostomy
![End-to-side antecolic duodenojejunostomy]()
Fashion this anastomosis approximately 50 cm downstream of the bilioenteric anastomosis. To this end, pull up the corresponding jejunal loop anterior to the colon and anastomose it with the postpyloric duodenal remnant with a two-layered suture line: Outer line with seromuscular sutures, inner line full-thickness (each line as running suture with PDS® 5-0).
-
Irrigation and drains
![Irrigation and drains]()
After irrigating the abdominal cavity and checking for hemostasis, remove the retractor systems. Drain the bilioenteric and pancreatic anastomoses via an Easy-Flow brought out through a stab wound in the lower right quadrant. In uncomplicated pancreatic anastomosis, the pancreas does not necessarily require a drain on the left side.
-
Closing the abdominal wall
![Closing the abdominal wall]()
After counting the lap towels and instruments, close the abdominal wall in two layers (posterior and anterior fascial lamina) with a running looped suture each (Monoplus®). Close the subcutaneous tissue with a running suture (Monosyn® 3-0) and the skin with staples. Attach the bags for the Easy-Flow and T-drain and cover the wound with a sterile dressing.