
- Positioning: Supine position with legs spread on a vacuum cushion. The cushion ensures stability, reducing the need for additional supports
- After trocar placement, the table is tilted to a 15° – 30° Anti-Trendelenburg position to optimize access
- Robot Docking:
- The Xi system offers flexibility in the docking position, typically from the left
- For X or Si systems, the cart is docked cranially from the right
- Team Positioning:
- Surgeon: At the console, ideally with a view of the patient and assistant
- Assistant: Positioned between the legs, sitting or standing
- Scrub Nurse: On the right side of the patient
- Anesthesiologist: At the patient’s head, on the right side
-
Patient Positioning and Operating Room Setup
-
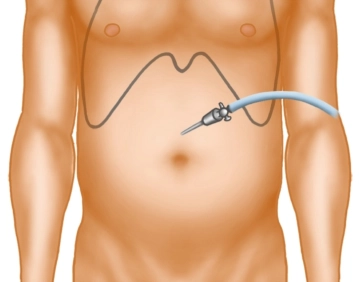
Pneumoperitoneum, Trocar Placement, and Docking
![Pneumoperitoneum, Trocar Placement, and Docking 1]()
![511_Trokarpositionen.jpeg]()
![Pneumoperitoneum, Trocar Placement, and Docking 3]()
Soundsettings Pneumoperitoneum Creation:
- Use a Veress needle at the Palmer point in the left upper abdomen.
- Establish an insufflation pressure of 12–15 mmHg
- Alternatively, employ Optiview technique
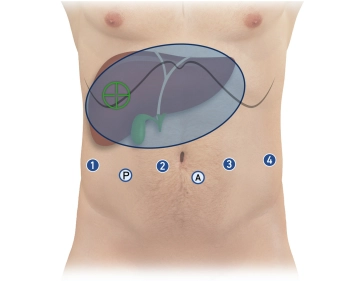
Trocar Placement:
- Total Ports:
- Four 8 mm robotic ports in a linear arrangement, 15–20 cm from the target anatomy (infraumbilical)
- Two 12 mm laparoscopic ports:
- Assistant trocar (caudal between robotic ports 2 and 3)
- Pringle maneuver trocar (caudal between robotic ports 1 and 2)
- Spacing: Approximately 8 cm between each port
- Position robotic trocars at the level of the muscular abdominal wall (aligning the broad black ring, the “Remote Center”)
Initial Instrument Configuration:
- Robotic ports (from right to left):
- Port 1: Monopolar curved scissors
- Port 2: Camera
- Port 3: Bipolar forceps
- Port 4: Prograsp forceps
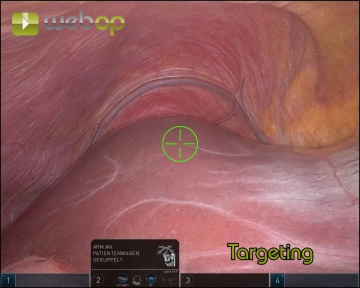
Docking the Robot:
- Dock the camera arm first (port 2)
- Execute Targeting (Xi system) to align robot arms with the surgical target
- Dock the remaining arms, ensuring 1 fist-width spacing between them
- Insert instruments under direct visualization via the assistant trocar
Key Precautions and Tips
Trocar Stability:
- Ensure the “Remote Center” aligns with the muscular abdominal wall to minimize shear forces during instrument movement
Instrument Placement:
- Use the assistant trocar and camera to inspect trocar alignment and verify instrument positioning before proceeding
Preventing Patient Movement:
- Double-check the vacuum cushion for leaks before sterile draping
- Secure arms during docking to avoid injury if the patient shifts
Control Checks:
- Before docking:
- Mark trocar points and ensure proper spacing
- Introduce the camera manually for inspection
- After docking:
- Verify arm alignment and positioning of instruments
-
Pre-Docking Checklist
- Perform a small incision in the left upper abdomen for Veress needle placement
- Establish pneumoperitoneum at 15 mmHg
- Mark the trocar line and insert the first robotic trocar
- Insert the camera manually to confirm placement
- Sequentially place:
- Three additional robotic trocars (8 mm)
- Two laparoscopic trocars (12 mm) in the caudal positions
- Transition to Anti-Trendelenburg position (15°)
- Dock the camera arm and insert the camera
- Perform Targeting with the Xi system
- Dock the remaining three arms
- Insert instruments and park them at the target anatomy:
- Port 1: Monopolar curved scissors
- Port 2: Camera
- Port 3: Bipolar forceps
- Port 4: Prograsp forceps
- Inspect remote centers via the assistant trocar to ensure proper alignment
This systematic approach optimizes patient safety, instrument positioning, and robot utilization, ensuring precision in robotic-assisted right hemihepatectomy.
-
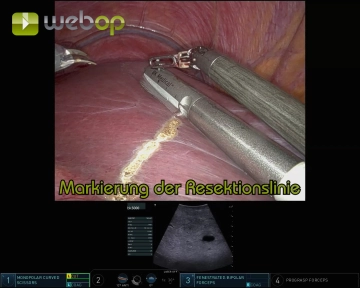
Intraoperative Sonography and Marking the Resection Line
![Intraoperative Sonography and Marking the Resection Line]()
Soundsettings Adhesiolysis:
- Release adhesions between the omentum majus, gallbladder, and inferior liver surface
- Grasp the gallbladder fundus with the Prograsp Forceps and retract cranially
- Expose the entire gallbladder to the infundibulum
Intraoperative Ultrasound:
- Insert the ultrasound probe through the assistant trocar
- Guide the probe with fenestrated bipolar forceps for precise movement
- Objective:
- Visualize lesions and their relationship to vessels and bile ducts
- Confirm the tumor-free status of the left liver lobe
- Identify critical landmarks, including the middle hepatic vein and segmental branches to Segments V/VI and VIII
Marking the Resection Line:
- Using monopolar scissors, mark the resection line on the ventral liver capsule under ultrasound guidance
-
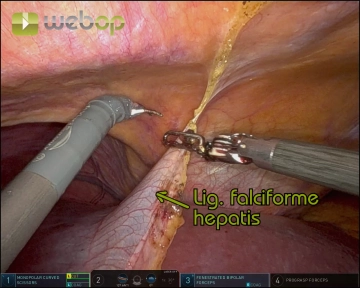
Division of the Ligamentum teres and Ligamentum falciforme hepatis
![Division of the Ligamentum teres and Ligamentum falciforme hepatis]()
Soundsettings Create a window between the ligamentum teres and the abdominal wall
Gradually divide both ligaments with meticulous coagulation, progressing from caudal to cranial up to the diaphragm and coronary ligament
- Tip: Use the detached ligamentum teres as a traction point for atraumatic manipulation of the liver during the procedure
-
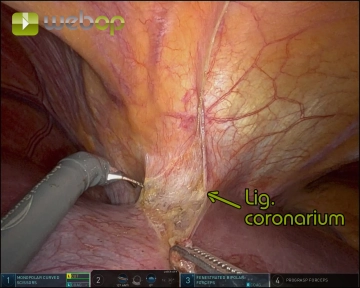
Exposure of the suprahepatic inferior vena cava
![Exposure of the suprahepatic inferior vena cava]()
Soundsettings Incision and division of the anterior coronary ligament and exposure of the hepatic venous confluence with the entry of the hepatic veins into the inferior vena cava.
Hilar Dissection
Access and Exposure:Elevate the liver using the Prograsp Forceps on the ligamentum teresOpen the om
Access and Exposure:Elevate the liver using the Prograsp Forceps on the ligamentum teresOpen the om
Activate now and continue learning straight away.
Single Access
Activation of this course for 3 days.
US$9.30
inclusive VAT
Most popular offer
webop - Savings Flex
Combine our learning modules flexibly and save up to 50%.
from US$4.33 / module
US$52.04/ yearly payment
robotics
Unlock all courses in this module.
US$8.67
/ month
US$104.10 / yearly payment
Webop is committed to education. That's why we offer all our content at a fair student rate.