Right Hemicolectomy, Robot-Assisted, with Complete Mesocolic Excision (CME) and UFA (Uncinatus First Approach) (Critical View Concept (CV))

Reading time readingtime 38:28 min.
Activate now
  1. Positioning

    Positioning 1
    Positioning 2

    Positioning the patient on their back and padding the extremities as well as pressure-sensitive areas.

    Positioning of both patient arms.

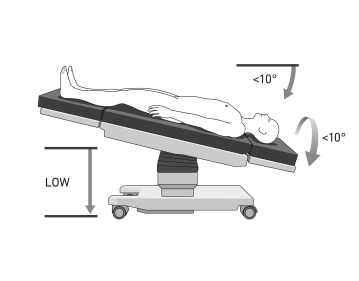
    Positioning in 10° reverse Trendelenburg and 10° left lateral position, table as low as possible.

    To maximize the reduction of positioning injuries and ensure safe positioning, positioning in the vacuum mattress is recommended.

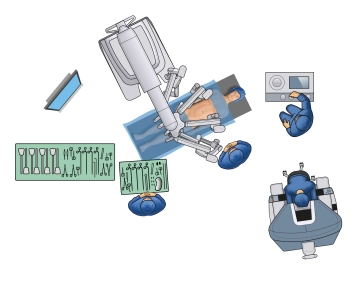
    Note: Positioning is particularly important due to the docking of the patient to the robot manipulator. The risk of injury to the abdominal wall when the patient slips must also be considered. With coupled tables in the Xi system, intraoperative position changes are possible without undocking. If the "Table-Motion" technique is not available, the surgical robot must always be undocked and removed from the operating table before any position change.

    Caution: Vacuum cushions may have leaks. Therefore, they should be checked again before sterile draping.

  2. Trocar positioning and docking

    Trocar positioning and docking 1
    Trocar positioning and docking 2

    Creation of a capnoperitoneum by inserting a Veress needle at Palmer's Point. Marking a line between a point 3-4 cm suprapubic and the left midclavicular line at the costal margin. Marking the trocars. Insertion of robotic trocars along this line. Port 3 should be a 12 mm trocar (stapler port).

    Note: In addition to conventional placement, trocar placement along the two anterior superior iliac spines can be performed with cosmetic advantages.

    Caution: The trocars should be 8 cm apart and at least 2 cm from the anterior superior iliac spine (ASIS) and the costal margin.

    A 12 mm assistant trocar is placed in the left mid-abdomen between and lateral to 2 and 3. Positioning in 10° anti-Trendelenburg and 10° left lateral position.

    Docking of the camera arm. Targeting maneuver. Docking of the other arms. Insertion of the instruments.

    Trocars for 2 "left hands"

    1: Cardiere or Tip Up

    2: Bipolar Forceps

    3: Camera/Linear stapler

    4: Scissors/Vessel sealer/Needle holder

    Caution: The trocars must be positioned with the wide black ring (Remote Center) at the level of the muscular abdominal wall. This ensures minimal shear movements.

    Note: Inspection of the robotic trocars with the camera via the assistant trocar during the insertion of robotic instruments. This allows easy verification of the position of all robotic trocars before the start of the operation.

  3. Checklist until Docking

    Checklist Xi Right Hemicolectomy up to Docking

    • Incision in the left upper abdomen, insertion of the Veress needle
    • Capnoperitoneum
    • Marking line and points for trocars
    • Insertion of 4 Xi trocars 8 cm apart
    • Insertion of the camera by hand after inserting the first trocar and insertion of the others under vision
    • 12 mm trocar with reducer sleeve at the 3 (stapler port)
    • Assistant trocar left mid-abdomen between 2 and 3
    • Positioning: 10° Trendelenburg, 10° tilt left
    • Dock camera arm + insert camera
    • Targeting
    • Dock 3 additional arms
    • Arms always one fist width apart
    • Check the remote center
    • Insertion of instruments and insertion into target anatomy (1: Tip up or Cardiere, 2: bipolar forceps, 3: camera/stapler 4: monopolar scissors/vessel sealer)
    • Burping by pressing the port coupling (port-clutch) to release the abdominal wall
    • Switch to the console
  4. Visualization of the uncinate process of the pancreas

    Video
    Visualization of the uncinate process of the pancreas

    Relocation of the small bowel package along with the greater omentum into the right upper abdomen. View of the Pars 4 duodeni and the duodenojejunal flexure.

    Caution: Careful prevention of small bowel lesions in this step.

    Incision of the peritoneum at the dorsocaudal edge of the duodenum. Presentation of the posterior wall of the duodenum. Here, lifting from the aorta and the vena cava. Upon completion, the right-sided mesocolon along with parts 2 to 4 of the duodenum is mobilized.

    Note: The layer is ideally achieved when this is done without bleeding.

    Mobilization of the duodenum from the medial side. Incision of Toldt's fascia to reach the anterior surface of the duodenum (Fredet's space). Preparation of the anterior surface of the duodenum and the pancreatic head as well as the uncinate process. Pushing the pancreatic head dorsally.

    Caution: Extreme caution is necessary to avoid pancreatic injuries with consequent fistula formation.

    In the middle of the pancreatic head, the preparation is completed with a view of the vessels (superior mesenteric vein (SMV)) from the dorsal side.

    Critical View 1: View of the horizontal part of the duodenum with the exposed uncinate process of the pancreatic head dorsal to the mesenteric root.

    Note: Regarding the approach according to the Critical View concept, refer also to the publication in Surgical Endoscopy: https://link.springer.com/article/10.1007/s00464-018-6267-0

  5. Preparation of the ileocolic vessels

    Video
    Preparation of the ileocolic vessels

    Relocation of the small bowel package to the left lower abdomen. View of the anterior surface of the mesentery and the right hemicolon.

    Note: By gently pulling on the appendix or the terminal ileum, the ileocolic vascular axis is easily identifiable. 

    Caution: Avoid tears in the mesocolon, hence no grasping here! Otherwise, the oncological quality is reduced.

    Critical View 2: V-View: View of the confluence of the ileocolic and superior mesenteric vessels before dissection.

    Incision of the meso at the angle between the ileocolic vessels and the superior mesenteric vein (angle bisector with a 3 cm distance to the confluence). 

    Note: Sometimes, the dissection plane from the previous step already shimmers through at a thin spot here.

    After incision of the mesentery, the dorsal dissection plane at the angle between the vessels is reached.

    Caution: The superior mesenteric artery (SMA) usually runs to the right of the superior mesenteric vein (SMV) and must not be injured.

    Insertion of an instrument through the opening and atraumatic lifting of the meso. Dissection of the SMV over at least half a circumference. Visualization of the ileocolic vessels at their origin.

Transection of the ileocolic vessels

Complete circular preparation of the ileocolic artery.Critical View 4: 360° visualization of the il

Activate now and continue learning straight away.

Single Access

Activation of this course for 3 days.

€7.99 inclusive VAT

Most popular offer

webop - Savings Flex

Combine our learning modules flexibly and save up to 50%.

from €3.70 / module

€44.50 / yearly payment

price overview

Robotik

Unlock all courses in this module.

€7.42 / month

€89.00 / yearly payment